
Aadhaar Enrolment – Unique Identification Authority of India
The Aadhaar Card, issued by the Unique Identification Authority of India (UIDAI), is a crucial identity document for every Indian citizen. It serves as proof of identity and address, making it essential for accessing various government services and benefits.
Here is everything you need to know about the Aadhaar card enrolment process, from the smallest details to the complete procedure.
What is Aadhaar Enrolment?
Aadhaar enrolment is the process by which an individual registers with UIDAI to receive a unique 12-digit Aadhaar number. This process is free of cost and involves providing biometric and demographic details.
Who Can Apply for Aadhaar (Official UIDAI Rules):
- All Residents of India: Both citizens and non-citizens residing in India
- Children of All Ages: Including newborns and infants
- Resident Foreign Nationals: Who have resided in India for 182+ days in the 12 months preceding enrollment
- NRIs: Non-Resident Indians with valid Indian address
- Important: Aadhaar enrollment is voluntary and free of cost
Required Documents (UIDAI Verified List)
Proof of Identity (POI) – Any ONE Document:
- Passport
- PAN Card
- Ration Card
- Voter ID Card (must be displayed online on Election Commission website)
- Driving License
- Government Employee ID Card
- Student ID from recognized institution
- Arms License
- Certificate of Identity with photo issued by Gazetted Officer/Tehsildar
Proof of Address (POA) – Any ONE Document:
- Passport
- Bank Account Statement (last 3 months)
- Post Office Account Statement
- Ration Card
- Voter ID Card
- Driving License
- Electricity Bill (last 3 months)
- Water Bill (last 3 months)
- Telephone/Landline Bill (last 3 months)
- Property Tax Receipt
- Rent Agreement
- Certificate with photo issued by MP/MLA/Gazetted Officer/Tehsildar
- Village Panchayat head certificate (for rural areas)
Proof of Date of Birth (POB) – Any ONE Document:
- Birth Certificate
- Passport
- PAN Card
- Driving License
- 10th Class Certificate/Marksheet
- Insurance Policy
- Government Employee ID
Aadhaar Enrollment Approaches (Official UIDAI)
1. Document-Based Enrollment (Standard Method)
- Submit one valid POI document
- Submit one valid POA document
- Most common enrollment method
2. Head of Family (HoF) Based Enrollment
- For family members without individual documents
- Head of Family enrolls first with valid documents
- HoF can introduce other family members
- Requires Proof of Relationship (PoR) documents
- Name must exist in family entitlement documents
Where to Enrol for Aadhaar?
- Aadhaar enrolment can be done at authorized Aadhaar Enrolment Centers located in banks, post offices, and government offices.
- Find Nearest Center: Use the UIDAI portal to locate the nearest enrolment center. (Link: Locate Enrolment Center)
Aadhaar Enrolment Process
The Aadhaar enrolment process involves visiting an authorized Enrolment Centre, completing the enrolment form, providing demographic and biometric data, submitting proof of identity and address documents, and receiving an acknowledgment slip with your Enrolment ID.
Below is the complete step-by-step enrolment procedure.
- Visit the nearest Aadhaar Enrolment Center authorized by UIDAI.
- Book an Appointment
- Online appointment: Schedule an appointment through the UIDAI Portal.
- Walk-in option: Some centers allow walk-ins without prior appointments.
- Checklist Before Visiting the Enrolment Center
- ✓ Aadhaar Enrolment Form.
- ✓ Original POI, POA, and DOB documents.
- ✓ A valid mobile number for OTPs (optional, but recommended).
- ✓ Appointment confirmation receipt (if applicable).
- Fill out the Aadhaar enrolment form with accurate details, including your name, date of birth, gender, and address.
- Submit original copies of your POI, POA, and DOB documents for verification. The operator will scan and upload them during enrolment.

- Capture Biometric Data (For Adults)
- Fingerprint scan (all 10 fingers)
- Iris scan (both eyes)
- Photograph
- For Children (below 5 years):
- Only a photograph is captured. Biometric data is updated once the child turns 5 and 15 years old.
- Review the information entered by the operator to ensure accuracy.
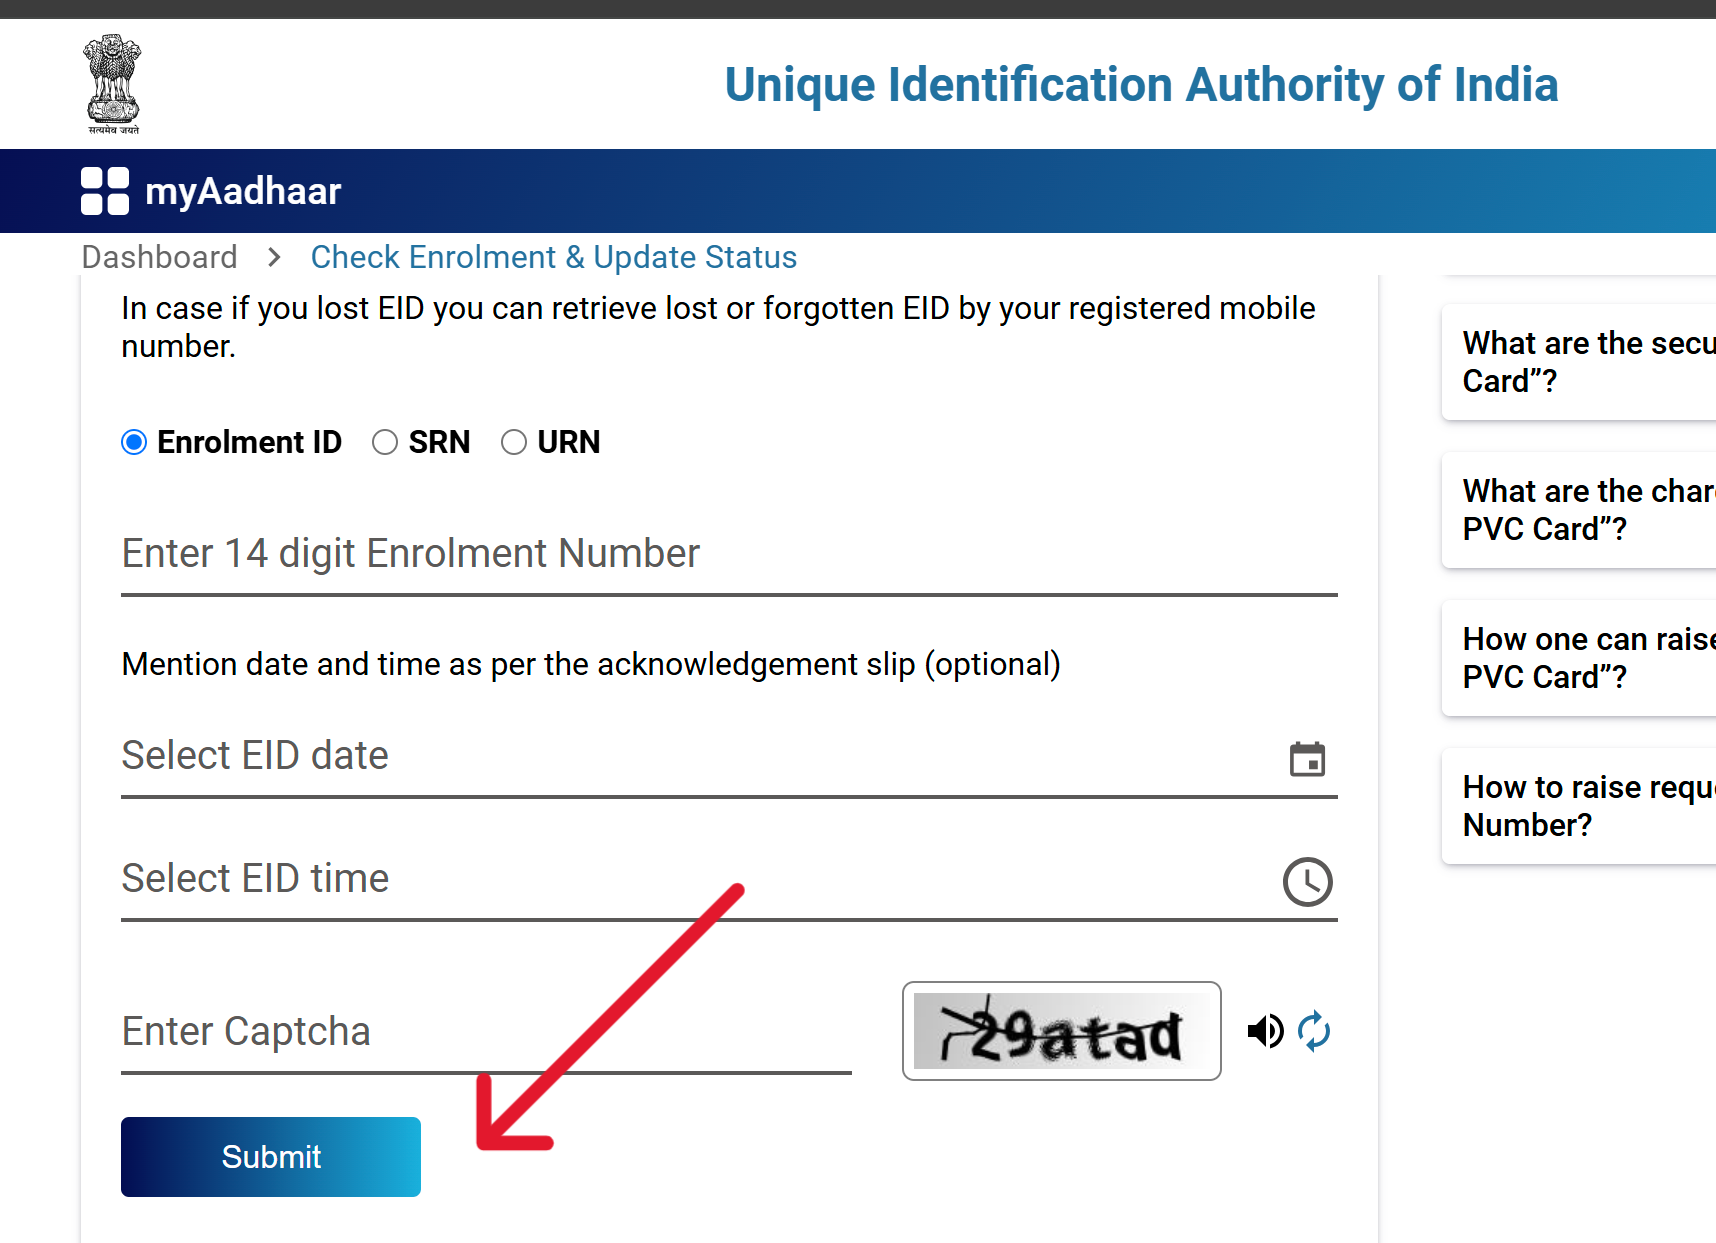
The operator provides an acknowledgment slip with the Enrolment ID (EID), which is crucial for tracking your Aadhaar application status.
Note: After enrolment, you can check your Aadhaar status using the Enrolment ID (EID) on the UIDAI Status Portal.
💡
The waiting time for Aadhaar is up to 180 days after the enrolment data is received in CIDR. CIDR stands for Central Identities Data Repository. It is the central database where all Aadhaar enrolment data is stored and processed by UIDAI.
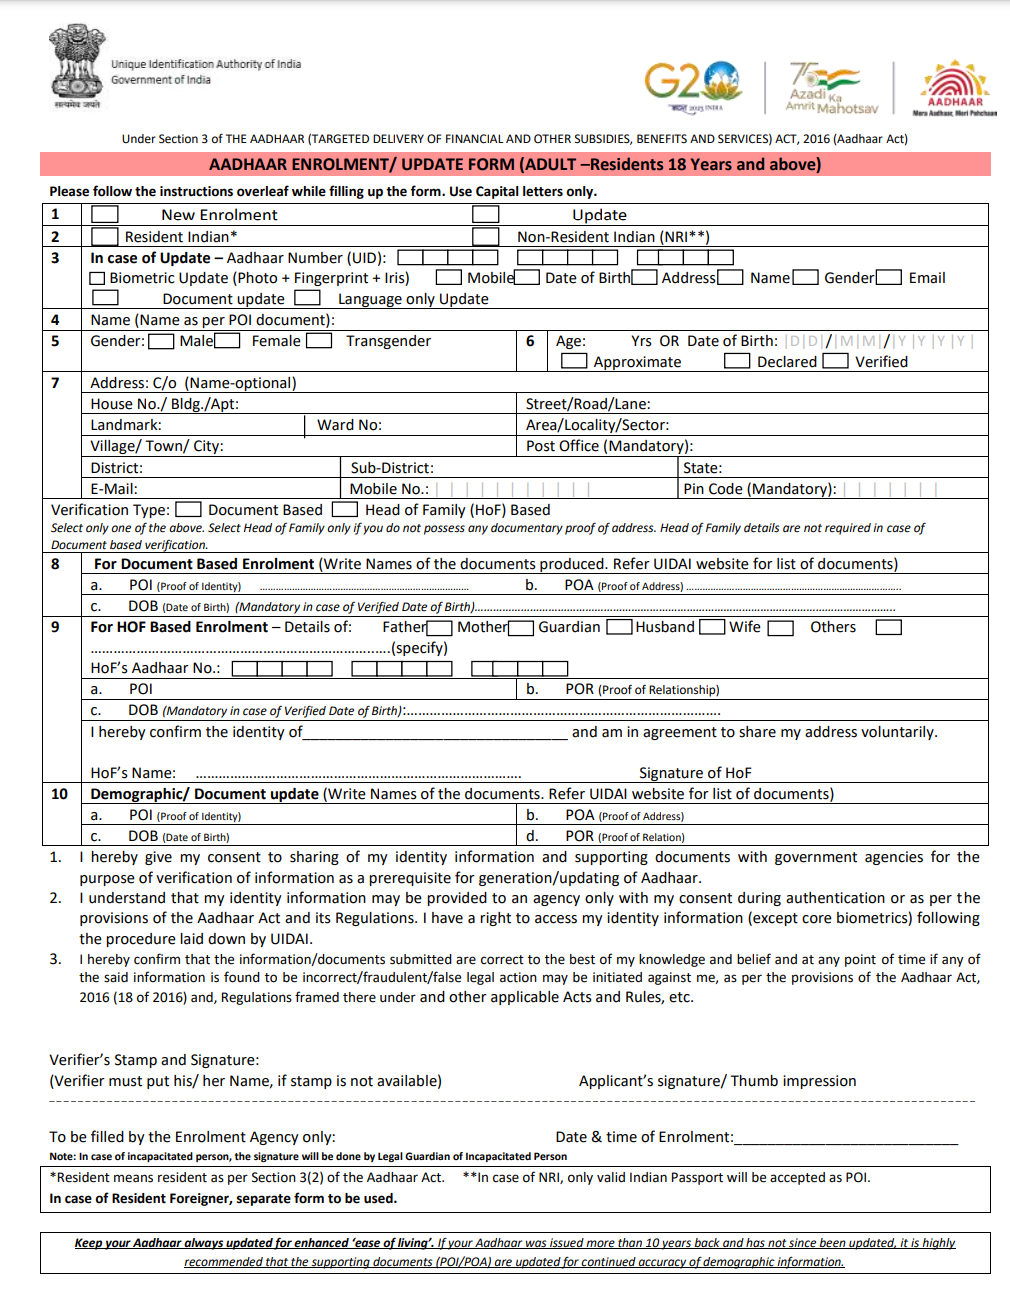
Instructions for Adults (18+ Years) While Filling Aadhaar Enrolment Form
| Field No. | Field Name | Instructions |
|---|---|---|
| 1 | Type of Enrolment | Indicate whether the application is for new enrollment or an update by ticking the appropriate box. |
| 2 | Status | Select the correct residential status. Residents and foreigners should use separate forms. For NRIs, only an Indian passport is valid as Proof of Identity (PoI). |
| 3 & 10 | Demographic Update | Provide your Aadhaar number and select the required service. For updates like name, ensure the name matches the existing Aadhaar record. Fill only the necessary fields for the specific update request. |
| 3 & 10 | Document Update | For document updates, submit supporting documents containing the same name and address as the existing Aadhaar. Mention the Aadhaar number, name, and document name in the form. |
| 4 | Name | Write your full name without titles or salutations. Bring the original PoI document. Minor spelling corrections are allowed (e.g., “Preeti” can be updated to “Priti”). |
| 6 | Date of Birth (DOB) | For individuals under 18, a Birth Certificate is acceptable with certain exceptions. A full date of birth will be printed on the Aadhaar card only if the DOB is verified with supporting documents. |
| 7 | Address | Write the complete address, including PIN code and post office. The state, district, sub-district, and village/town/city (VTC) will be automatically fetched based on the PIN code. C/o (Care of) fields do not need additional documents. Minor changes to complete the address are allowed without altering the base address. |
| 9 | HOF-Based Enrolment | Both the resident and Head of Family (HOF) must visit the enrollment center with the Proof of Relationship (PoR) document showing the names of the HOF and applicant, along with the HOF’s Aadhaar number. HOF-based enrollment is not available for Resident Foreigners. |
| – | List of Documents | The updated list of valid documents is available on the UIDAI website: List of Documents. Ensure that the submitted document complies with the list provided by UIDAI. |
| – | Resident Foreigners | Foreign residents must complete a separate Aadhaar enrollment or update form. |
Important Points During Enrolment
- No Fees: Aadhaar enrolment is completely free.
- Accuracy: Ensure all data provided is accurate to avoid discrepancies in the Aadhaar card.
- Mobile Number Linking: Provide your mobile number during enrolment for OTP-based Aadhaar services.
- Update for Children: Children with Aadhaar who have turned 15 or anyone needing to update their biometric details, such as fingerprints, iris scans, or photographs, must visit an Aadhaar Enrolment Center. Ensure you carry valid address proof documents for the update process.
Locate an Enrolment Center
To search for an Aadhaar Enrolment Center, follow these steps:
- Visit the UIDAI official website: https://appointments.uidai.gov.in/
- Click on the Locate Enrolment Center in My Aadhaar → Get Aadhaar section.
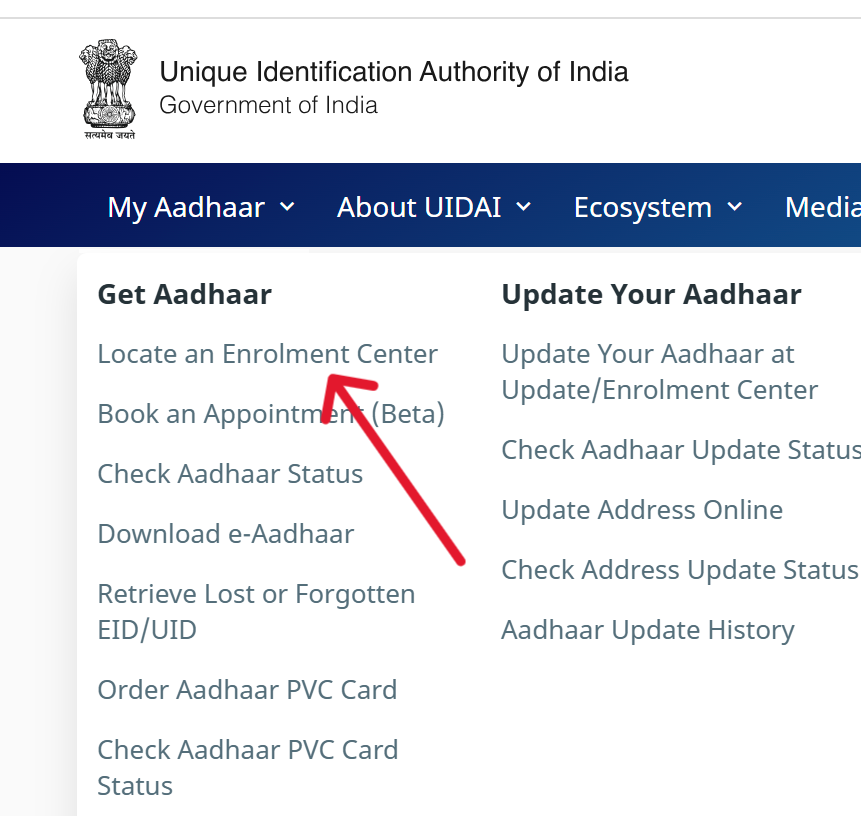
- Select the option for your region: State, Postal (PIN) Code, or Search by Center Name.
- Enter the required details such as state, district, or PIN code.
- Click on the Locate Center button.
- The list of nearby Aadhaar Enrolment Centers will be displayed with their address and contact information.
Make sure to book an appointment online if required.